


 English
 بالعربية
 Deutsch
 Français
 Bahasa Indonesia
 Italiano
 日本語
日本語 қазақ
қазақ 한국어
한국어 Bahasa Malay
 Монгол
 Nederlands
 Język polski
 Português
 Русский язык
 Español
 ภาษาไทย
 Türkçe
Changing the liners in your cone crusher is a critical maintenance task that ensures consistent performance and optimal efficiency. Neglecting this process can lead to increased power draw and reduced grinding chamber effectiveness. By following a systematic approach, you can significantly improve operational outcomes.
Studies have shown a 20% decrease in power draw caused by inefficient operation when liners erode.
Properly shaped liners can reduce scrap metal from 47% to 30% while extending liner life by an additional 1,500 hours.
This guide provides the steps you need to replace the liners safely and effectively, minimizing downtime and maximizing crusher productivity.
When to Change Cone Crusher Liners
Knowing when to change cone crusher liners is essential for maintaining optimal performance and minimizing downtime. Timely replacement ensures consistent production levels and prevents costly damage to your equipment. Below, we’ll explore the key indicators for liner replacement, the effects of delaying this process, and the recommended timing for making the change.
Key Indicators for Liner Replacement
Several measurable criteria can help you determine when to replace your cone crusher liners. Monitoring these indicators ensures you can act before significant issues arise:
- Liner Thickness: Check the liner thickness regularly. Replace the liners when they wear down to 1 inch (2.5 cm) at the bottom. This prevents cracking and disintegration, which can lead to equipment failure.
- Production Level: A noticeable drop in production—typically 10% or more—signals that the liners are no longer effective. Reduced output often results from uneven wear or a compromised grinding chamber.
By keeping an eye on these factors, you can avoid unexpected downtime and maintain consistent crusher performance.
Effects of Delayed Liner Changes
Delaying liner replacement can have serious consequences for your cone crusher. Worn liners reduce the efficiency of the crushing process, leading to higher energy consumption and lower output. Over time, this can cause:
- Increased Power Draw: As the liners wear, the crusher requires more power to achieve the same level of performance. This not only raises operational costs but also puts additional strain on the equipment.
- Damage to Crusher Components: Worn liners can lead to uneven wear patterns, which may damage other parts of the crusher, such as the mantle or concave. Repairing or replacing these components can be expensive and time-consuming.
To avoid these issues, it’s crucial to replace the liners as soon as the key indicators suggest they are no longer effective.
Recommended Replacement Timing
Replacing cone crusher liners at the right time is critical for maintaining efficiency and preventing damage. Research and industry best practices suggest the following guidelines:
1. Monitor production levels closely. If you notice a drop of 10% or more, it’s time to replace the liners.
2. Regularly measure liner thickness. When it reaches 1 inch (2.5 cm), schedule a replacement to avoid cracking or disintegration.
Following these recommendations ensures your crusher operates at peak efficiency and minimizes the risk of costly repairs. Additionally, consult your equipment supplier for specific guidelines tailored to your crusher model and operating conditions.
Preparation Before Changing Cone Crusher Liners
Safety Measures to Follow
Prioritizing safety during a cone liner change is essential to prevent injuries and ensure smooth operations. You should implement a robust safety protocol to minimize risks associated with this hazardous manual task. Key safety measures include:
- Wearing Personal Protective Equipment (PPE): Always use helmets, gloves, safety glasses, and steel-toed boots to protect yourself from falling debris and sharp edges.
- Lockout/Tagout Procedures: De-energize and lock out the crusher to prevent accidental startup during the liner change.
- Proper Training: Ensure all team members are trained in handling heavy equipment and understand the risks involved.
Process safety incidents can lead to severe consequences, including injuries, environmental damage, and business interruptions. Following safety frameworks like API 754 helps assess safety management systems and predict potential incidents.
By adhering to these measures, you can reduce the likelihood of accidents and maintain a safe working environment.
Tools and Equipment Checklist
Having the right tools and equipment on hand can significantly reduce downtime during a liner change. Essential items include:
- Power Tools: Use power tools for tasks like loosening bolts to save time and effort.
- Hydraulic Torque Multiplier: This tool efficiently removes stuck mantle bolts, eliminating the need for costly contractor assistance.
- Lifting Equipment: A crane or hoist is necessary to safely remove and install the bowl liner and cone liner.
- Inspection Tools: Keep calipers and gauges ready to measure liner thickness and ensure proper fit.
The Yarrabee Road Quarry team demonstrated how innovative tools, such as a new nut configuration for power tools, can streamline preparation work and improve efficiency. Investing in the right equipment ensures a smoother process and minimizes delays.
Pre-Change Inspections
Before starting the liner replacement, conduct thorough inspections to identify potential issues. Begin by examining the crusher for wear and tear, focusing on the b owl liner and cone liner. Check for cracks, uneven wear, or loose components. Inspect the hydraulic system to ensure it operates correctly and can handle the weight of the liners.
Additionally, verify that the replacement liners match the specifications of your crusher. Proper liner selection is crucial for maintaining optimal performance and preventing damage. By addressing these factors beforehand, you can avoid unexpected complications during the liner change process.
Step-by-Step Guide to Changing Cone Crusher Liners
Removing the Old Liners
Removing the old liners is the first step in the liner changeout process. This task requires precision and care to avoid damaging the cone crusher or its components. Follow these steps to ensure a smooth blow liner removal:
De-energize the Crusher: Begin by shutting down the cone crusher and following lockout/tagout procedures to prevent accidental startup.
Loosen the Fasteners: Use a hydraulic torque multiplier or power tools to loosen and remove the bolts securing the old liners. This step minimizes manual effort and reduces the risk of injury.
Lift the Liners: Attach lifting equipment, such as a crane or hoist, to the liners. Carefully lift and remove the bowl liner and cone liner from the crusher. Ensure the lifting equipment is rated for the weight of the liners.
Inspect During Removal: As you remove the liners, inspect them for signs of uneven wear, cracks, or other damage. This inspection helps identify potential issues that may affect the crusher's performance.
Tip: During blow liner removal, check for imperfections such as tears, punctures, or blisters in synthetic liners. For soil-based liners, look for signs of increased permeability. These inspections ensure the crusher operates efficiently after the liner changeout.
Inspecting the Crusher Components
After removing the old liners, inspect the crusher components thoroughly. This step is critical for identifying wear or damage that could impact the installation of new liners or the crusher's overall performance. Focus on the following areas:
Mantle and Concave: Examine the mantle and concave for cracks, uneven wear, or other damage. If necessary, replace the cone crusher mantle or replace the cone crusher concave to maintain optimal performance.
Seating Surfaces: Check the seating surfaces where the liners rest. Ensure they are clean, smooth, and free of debris or damage.
Hydraulic System: Inspect the hydraulic system for leaks or malfunctions. Verify that it can handle the weight of the new liners during installation.
Fasteners and Threads: Examine the bolts, nuts, and threads for wear or damage. Replace any components that show signs of deterioration.
Note: Liners and cover systems must be inspected for uniformity, damage, and imperfections during this stage. Addressing these issues ensures a secure and effective liner installation.
Installing the New Liners
Proper installation of the new liners is essential for ensuring the crusher operates efficiently and safely. Follow these steps for a successful bowl liner installation and cone liner replacement:
Position the Liners: Use lifting equipment to carefully position the new bowl liner and cone liner in the crusher. Align them with the seating surfaces to ensure a proper fit.
Secure the Liners: Tighten the bolts using a hydraulic torque multiplier or power tools. Follow the manufacturer's torque specifications to prevent over-tightening or under-tightening.
Check Alignment: Verify that the liners are correctly aligned and seated. Misaligned liners can cause uneven wear and reduce the crusher's efficiency.
Test the Installation: Re-energize the crusher and run it at low speed to test the installation. Listen for unusual noises and monitor the crusher's operation to ensure everything is functioning correctly.
Tip: During liner changeout, always use liners that match the specifications of your cone crusher. Proper liner selection extends the life of the liners and improves the crusher's performance.
By following these steps, you can change cone crusher liners efficiently and minimize downtime. Proper removal, inspection, and installation ensure the crusher operates at peak performance and reduces the risk of costly repairs.
Securing and Testing the Installation
Securing and testing the installation of new liners is the final step in the process to ensure your cone crusher operates efficiently and safely. Properly securing the liners prevents movement during operation, while thorough testing confirms that the crusher is ready for optimal performance. Follow these steps to complete the process effectively:
Tighten the Fasteners
After positioning the new liners, use a hydraulic torque multiplier or power tools to tighten all fasteners. Refer to the manufacturer's torque specifications to avoid over-tightening or under-tightening. Properly secured liners reduce the risk of movem ent or misalignment during operation.Inspect the Alignment
Carefully inspect the alignment of the liners. Misaligned liners can cause uneven wear and reduce the crusher's efficiency. Use calipers or gauges to verify that the liners are seated correctly on the mantle and concave. This step ensures the liners fit securely and evenly.Test the Crusher at Low Speed
Re-energize the crusher and run it at low speed to test the installation. Listen for unusual noises, such as grinding or rattling, which may indicate improper liner seating. Monitor the crusher's operation to confirm that all components are functioning as expected.Check for Vibrations
During the test run, observe the crusher for any unusual vibrations. Excessive vibrations could signal loose fasteners or misaligned liners. Address these issues immediately to prevent damage to the crusher and ensure smooth operation.Conduct a Load Test
Once the low-speed test is successful, conduct a load test by gradually increasing the crusher's speed and introducing material into the chamber. Monitor the crusher's performance to ensure it operates efficiently with the new liners. A successful load test confirms that the liners are properly installed and ready for full-capacity operation.
Tip: Always document the torque values, alignment checks, and test results during this stage. Keeping detailed records helps you track maintenance activities and identify patterns that may affect the crusher's performance.
By following these steps, you can secure and test the installation of new liners with confidence. This process ensures that your efforts to change cone crusher liners result in improved efficiency and reduced downtime.
Post-Change Maintenance for Cone Crusher Liners
Verifying Installation Accuracy
After replacing cone crusher liners, verifying the accuracy of the installation is essential for achieving optimal cone crusher performance. Begin by inspecting the alignment of the liners. Use calipers or gauges to confirm that the liners are seated evenly on the mantle and concave. Misalignment can lead to uneven wear and reduced efficiency.
Next, check the torque values of all fasteners. Properly tightened bolts prevent movement during operation, reducing the risk of damage to wear parts. Document these values for future reference as part of your preventative maintenance routine. Finally, conduct a test run at low speed to identify any unusual noises or vibrations. Addressing these issues early ensures the crusher operates smoothly and safely.
Adjusting Crusher Settings for Optimal Performance
Fine-tuning the crusher settings after a liner change is critical for maintaining efficiency and extending wear life. Adjust the settings based on the material type, feed size, and desired output. Calibration standards, such as the ones outlined below, can guide you in achieving precise adjustments:
| Calibration Parameter | Description |
|---|---|
| Lower Triangular Breakage Function Matrix | Enhances model accuracy by treating every entry as a calibration parameter. |
| Optimization Problem | Uses a least squares method to minimize the objective function. |
| Industrial Data Utilization | Relies on operational data, eliminating the need for additional lab tests. |
These adjustments ensure the crusher operates at peak efficiency while minimizing wear on critical components.
Tips for Prolonging Liner Life
Extending the wear life of cone crusher liners requires consistent maintenance and proper operational practices. Start by gradually increasing power after installation to work harden the liners. This process strengthens the material, enhancing its durability. Maintain a continuous choke feed to the crusher. This practice ensures even wear and prevents premature failure of wear parts.
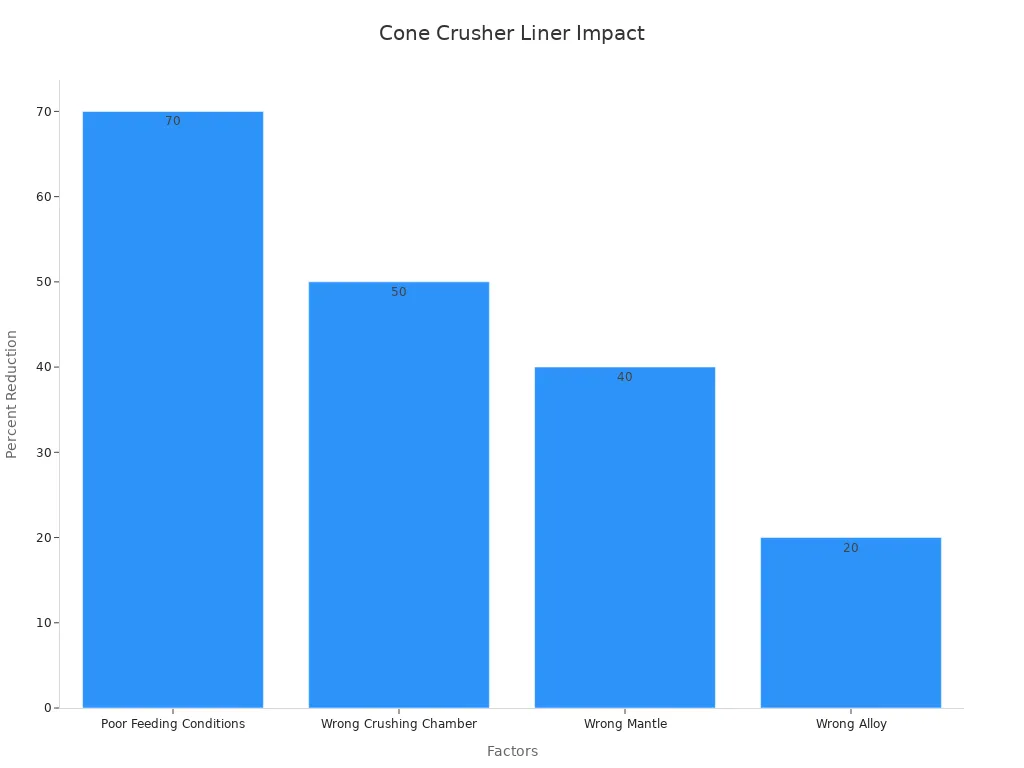
Regular inspections and timely replacements of worn parts are crucial. Clean the hydraulic system monthly to prevent contamination, which can reduce performance. Feeding conditions also play a significant role in liner longevity. Poor feeding can reduce wear life by up to 70%, while incorrect crushing chambers or alloys can cause reductions of up to 50% and 20%, respectively.
By following these tips and conducting regular risk assessments, you can maximize the lifespan of your liners while ensuring work health and safety standards are met.
Timely cone crusher liner changes are essential for maintaining equipment efficiency and preventing costly downtime. By replacing liners before they wear excessively, you can avoid mechanical issues like cracking or disintegration, as outlined in the table below:
| Indicator | Description |
|---|---|
| 10% Drop in Production | A significant indicator that cone crusher liners need replacement. |
| 1" Thickness | Time to consider changing if the liner wears down to this thickness. |
| 3/4" to 5/8" Thickness | Risk of cracking and disintegration of backing material. |
| Exceeding Operating Life | Causes mechanical issues, including flexing and cracking of the liner. |
Following the outlined steps ensures safety and efficiency during liner changes. Regular inspections and maintenance also play a critical role. Modern technologies like laser scanning help identify wear patterns early, allowing you to schedule replacements proactively. This approach minimizes unexpected downtimes and extends the operational lifespan of your machinery, leading to significant cost savings.
By adopting these practices, you can optimize your cone crusher's performance, reduce operational costs, and enhance overall productivity.
FAQ
What factors should you consider when selecting a cone crusher liner?
You should evaluate the material type, feed size, and desired output. Consider the liner's profile and alloy composition to ensure compatibility with your crusher. Proper selection improves efficiency and extends liner life.
How often should you inspect cone crusher liners?
Inspect liners weekly to monitor wear patterns and thickness. Regular checks help you identify issues early, ensuring timely replacements and preventing equipment damage.
Can improper liner installation affect crusher performance?
Yes, improper installation can cause misalignment, uneven wear, and reduced efficiency. Always follow the manufacturer's guidelines and verify alignment during installation to avoid these issues.
What is the best way to prolong the life of cone crusher liners?
Maintain a continuous choke feed and avoid overloading the crusher. Gradually increase power after installation to work harden the liners. Regular maintenance and proper feeding conditions also extend liner life.
How do you know when to replace cone crusher liners?
Replace liners when thickness reduces to 1 inch or production drops by 10%. Delaying replacement risks equipment damage and higher operational costs.